Sunday, May 19, 2019


Springtime in the Great Smoky Mountains


It is mid-April and I have returned once again to the Great Smoky Mountains National Park to savor springtime. The profusion of blooms there is overwhelming and my camera gets a workout. Dogwoods are at their peak, trillium carpet the forest floor and other small flowers and creatures have come alive after a long winter. 

This was my chance to sharpen my skills and to reconnect with a vibrant world. From my tent site  perched above the Little River, which was not so little after 4-5 inches of rain, I ventured out for five days to explore and capture the beauty of spring in the southern Appalachian mountains.

One of my favorites was the waterfall near the Middle Prong which appeared after the rainstorm. 


Rainfall Waterfall


And this nearby waterfall before the rains, which runs most of the time with the exception being extended dry periods.

Falling Waters


I decided that the most interesting thing about this chickweed flower was the contrast between the red stamens of the flower and the white petals.  This required getting very low and using a macro lens and extension tube. Quite striking indeed. 

Chickweed

A new area for photography near the park is now available. The Foothills Parkway has a new 8 mile section that just opened in November 2018. This beautiful parkway traverses the mountains near Townsend, TN. Also known as the "Missing Link", this road took 52 years to build due to financial and engineering issues. On Easter morning I captured this image of the dogwoods and mountains. There was even an Easter Sunday outdoor church service there and the scene was stunning. 


Foothills Vista

No trip to the Smokies is complete without a tour through Cades Cove, and spring in the cove is when bear cubs are just emerging from their dens to explore their world. Avoiding the bear jams, I just missed seeing one young family of bears, but there was much more to see and photograph in the cove. Such as this tranquil scene with just emerging leaves illuminated by late evening light. There is a small cemetery below these trees and the fence keeps the deer at bay.

Cades Cove Evening


With all of the blooming flowers there are many bees and other insects going about their daily chores. You have to appreciate the role that bees play in our environment. Without their pollinating work, many of the foods that we eat would not exist and many flowers depend on bees to spread their pollen. Again, this was a chance to work closely with the small world. 

A Bee's Work

As mentioned earlier, dogwoods were at their peak. Again shooting in the rain, this dogwood across the stream really caught my eye. It was getting quite dark and heavier rain was moving in when I captured this image. This tree is growing along the banks of the Middle Prong River and the swollen river was tugging at the now partially submerged branches. So, of course I had low light and motion in the tree. In order to freeze the motion, I needed a slightly faster shutter speed.  Thankfully, these new cameras give the option of using a much higher ISO.  This dogwood was just so majestic. 

Dogwood Blossoms

Of course spring does not last forever, and I could not stay much longer. So I headed north for another chance to watch spring arrive. Time to again watch the world come alive and to be thankful for the chance to savor the beauty we have in this world. 

 I will be back for another spring and perhaps as soon as next year at the NANPA Nature Photography Celebration in Asheville, North Carolina from April 19-22. There I will get to network with other photographers as we enjoy springtime in the Carolinas. 


Monday, March 11, 2019

Shooting Death Valley

After being inspired at the recent North American Nature Photography (NANPA) Summit in Las Vegas, Nevada, myself and several fellow photographers took a quick side trip to Death Valley National Park. If you talk to most people, they have the impression that Death Valley is always hotter than an oven. On the contrary, while we were there in late February nighttime temperatures were in the low 30's and the days warmed to the 60's and 70's. So it was not too hot. In fact, it was to our good fortune that there were snow capped mountains throughout the area to include in our photos.

This was my first visit to Death Valley and we only had two mornings and one afternoon to shoot. We stayed in a hotel in Beatty, NV which is a short drive to the eastern part of the park. Getting up each morning at 4 a.m. we grabbed coffee, donuts and whatever else would serve as breakfast and headed off to our chosen shooting spot.

The first spot was the Mesquite Dunes. Fortunately, we had a little time to scout the night before, because our first trip there involved a wrong turn. I have seen incredible photos from there and I hoped to score a keeper shot. Death Valley like most of our national parks has seen a dramatic increase in visitation. Mesquite Dunes, near Stovepipe Wells is a popular spot and there were many, many footprints in the dunes. Getting away from most of the prints required hiking about a mile into the dunes. Being in the desert means harsh sunshine and the soft morning light does not last long. I have a couple of photos from the dunes that I like including this one:

Mesquite Dunes
 Luckily, I found an area of the dunes without any nearby footprints.

After spending about an hour and a half in the dunes we headed out for a real breakfast. Restaurants in the park or surrounding the park are few and also not exactly five star establishments. But we were hungry and we found a nice breakfast buffet.

Our next location was Badwater Basin, listed as 283 feet below sea level, and known as the lowest point in the United States.  Here pure white salt pans create an other worldly scene. These geometric shapes can fill with water if there is rainfall, and we just missed such an event by a week. Reflections from the water filled pans can be dramatic. Regardless, I did manage to capture a few nice images of this most unusual landscape. Here is one from Badwater Basin.

Badwater Basin

And another that shows the snow capped mountains in the distance.

Badwater Basin and Mountains

Surreal landscape isn't it!

Working on a good tip we made our plans for Zabriskie Point for sunrise the next morning. We also did some scouting to find the location and timed our travel back to our hotel. I might add too that hotels are not exactly plentiful and again the one we stayed in was only adequate.

Zabriskie Point is perhaps one of the most iconic locations in the park. Sunrise lights the eroded foreground mountains and the even taller mountains in the distance that aim for the sky. The light that morning was phenomenal. Intermittent clouds added detail to the sky while diffusing the light for what seemed like a long time. There were so many things to point my camera at, but this photo perhaps captures the scene best:

Zabriskie Point

I even liked the scene so much that I had to try something in black and white.
Black and White Zabriskie Point

We saw little in the way of wildlife, the only exception being a coyote dining on the side of the road.  

All-in-all it was a great introduction to a special place. It was just too short and before we knew it we had to return to Las Vegas and planes to take us home. While in the park I learned of Darwin Falls which believe it or not flows year around. Also, some of the early wildflowers were said to be blooming in Coyote Canyon. The famous sliding rocks of the racetrack and even taller dunes on the other side of the park were enticing, but there was just not enough time. 

Just a couple of notes on equipment. My primary camera was still in the shop and I was fortunate as a Nikon Professional to get a loaner. Also, my 70-200 mm lens which has been a workhorse lens for over 10 years finally refused to focus after on our last visit to Badwater Basin.  Neither the auto focus or manual focus worked. 

There is just so much more to Death Valley than the little that we saw and captured. Perhaps there will be another visit someday.  Thanks to Ragnar Avery and Kika Tuff for the great company on the trip. It was nice to share the experience and all of us enjoyed the adventure. 

One final note, my upcoming wildflower workshop scheduled for May 11 & 12 in Cadillac, Michigan will be an exciting chance to savor ephemeral spring flowers in the beautiful northwoods. Too, we will be capturing shots we will forever enjoy. To sign up online got to https://www.michigan.gov/dnr/0,4570,7-350-79135_79219_81143-489192--,00.html

Saturday, February 16, 2019

February - March 2019 Newsletter

My February - March 2019 Newsletter is now available online at https://mailchi.mp/256831b4e4f2/february-2019-newsletter

Friday, February 8, 2019

Spring Wildflower Photography

After a long winter of sleeping under a blanket of snow, spring wildflowers magically awaken as the spring days become warmer and the snow finally melts. This is one of my favorite times of the year. After a seemingly endless winter, brilliant sunshine, blue skies and longer days with birds singing to attract mates makes me feel re-energized as I happily head to the woods with my camera in my hand and a spring in my step.

Luckily for me, from my home in northern Michigan, it is not far to the nearest woods to visit and photograph ephemeral spring wildflowers. It seems that within days of seeing bare ground, spring beauty, hepatica and bloodroot emerge and bloom. Later in April, Dutchman's breeches, squirrel corn, wake robin trillium and trout lily decorate the forest floor with their blossoms. In my neck of the woods the showiest display peaks around the second week of May, often on Mother's Day.  That is when the giant white trillium literally form a carpet below rich woods of sugar maple, American beech, basswood, white ash and yellow birch. 

The spring show is short-lived as the leaves in the canopy eventually shade the forest floor and the flowers disappear until the next spring.  My quest is to photograph as much of the fleeting display as possible.  However, for me, it is not just about documenting the show, it is about how to capture the fleeting springtime beauty and a sense of being re-awakened that will last throughout the year.

My choice of tools include my Nikon D850 with a articulating view screen that allows me to get low with the flowers and a wide variety of lenses. Extreme closeups are done with a 105 mm macro lens and perhaps an extension tube such as in this close-up photo of a bloodroot.


Wide angle closeups captured with a 14-24 mm wide angle lens that show the flower in the forest setting are a favorite of mine. These photos give a sense of place and scale. This photo made by combining a series of photos taken with differing focus points to extend the depth of field is known as focus stacking and is one of the techniques I teach in my spring wildflower workshop scheduled for May 11 & 12.  More details and information on registration will be available shortly. 


As some flowers look skyward, they are best photographed from above such as these crested dwarf iris captured in the Great Smoky Mountains National Park with a 24-70 mm lens.


Getting sharp photos requires a great deal of patience, as often the wind will make the flowers dance. It also requires a tripod to steady the camera and perhaps a focusing rail to easily move the camera to get the composition and focal point. I will provide more information on techniques to get sharp flower photos in my upcoming wildflower workshop. 

Believe it or not,  I sometimes leave things out of focus, this is called selective focus, and it is done to create a more artistic rendering of a wildflower such as this photo of a white foam flower with a wild geranium to add a dash of color. This is another technique I will discuss in my upcoming wildflower workshop scheduled for May 11 &12 to coincide with the normal peak of the wildflower season. 


There are a lot more tools and techniques that I will cover in depth in my workshop. It will be a great time as we capture the beauty of the northwoods in the spring.  

Meanwhile,  I will leave you with one of my award winning wildflower photos and invite you to enjoy my small world gallery on my website. 


If you would like more information or have questions about my photography, please feel free to e-mail me at thaxby02@yahoo.com


Sunday, February 3, 2019

What's in my bag?

Since my first digital camera back in 1998, a Kodak DC 290, which was a 1.4 megpixel point and shoot, I have been fortunate to have been able to steadily acquire better equipment. Funny that back then Kodak was into digital photography, but they bet against it catching on (oops). Speaking of camera manufacturers, I do not think there is a great deal of difference between Nikon, Canon, Sony and a few of the other manufacturers which are making good equipment. So, I am not going to get into the debate about who has the latest and greatest cameras or lenses.

Before diving into my camera bag, another caveat on gear - all the best camera gear in the world will not make you a great photographer. It is still what is behind the camera and between your ears and perhaps a little of what is in your heart that will make you a better photographer. It does help though to have an assist from today's technology in your hands. The right tools in the hands of a craftsman can result in some really special things.

First and foremost, the camera is a Nikon D850 which unfortunately is being repaired by Nikon at the moment. This was my latest acquisition almost a year ago and I am simply amazed at some of the images I have taken with this camera. With a 45.7 megapixel (mp), full-frame, CMOS sensor and a frame rate of 7 frames per second, which can be increased to 9 frames per second with the battery pack, this is a great camera for almost type of shooting. The images from this camera are just stunning. My backup camera is a Nikon D750 which has a 24 mp full-frame sensor which does very well in low light at high ISO settings.

I have the trifecta of Nikon lenses - the 14-24mm, 24-70mm and the 70-200 mm, all of which are f2.8 lenses. This is one of Nikon's best lenses and I consider this to be my sky lens. Dramatic clouds really stand out when I use this lens. Here is one example:

I also like the 14-24 mm for closeup wide-angle shots such as this northern leopard frog.  The lens was only a couple of inches from the front of the frog in this shot.


The 24- 70 mm is a versatile lens that gets a lot of everyday use.  Both the 24-70 mm and the 70-200 mm take a 77 mm filter which is convenient. The 70-200 which I use for stage events and other medium telephoto shots has first generation vibration reduction (Nikon's term).  Canon calls it image stabilization and other manufacturers use their own terminology.  I also have the Nikon 500 mm f4 lens that I use for birds and other wildlife. This is one of Nikon's best telephoto lenses and I find the resolution and bokeh (out of focus background) to be outstanding. Below is one of my birds taken with this lens. I love the sharpness of this lens and it helps to have an aperture of f4 available if needed. But quite frankly,  I find that the sharpest f-stop for this lens to be around f8 to f11. The main drawbacks are the cost and weight of this lens.


I also use the Nikon 1.4x and 1.7x teleconverters to extend the reach of the 500 mm lens. Again it is nice to add these to a f4 lens as the teleconverters reduce the light by 1 1/3 and 1 2/3 stops of light respectively. I find that I still get super sharp images even with the teleconverters.

Finally, as I also like to do close up work I currently have the 105 mm Nikon f 2.8 D macro lens.  This is an older lens and I am looking to upgrade to the AFS version of this lens. This will enable me to use the focus shift feature on the Nikon D850 to create a series of images at different focus points that can later be stacked using Photoshop to extend the depth-of-field. Also, known as focus stacking, the ability to automatically capture a series of images at different focus points is a great new feature on the D850.

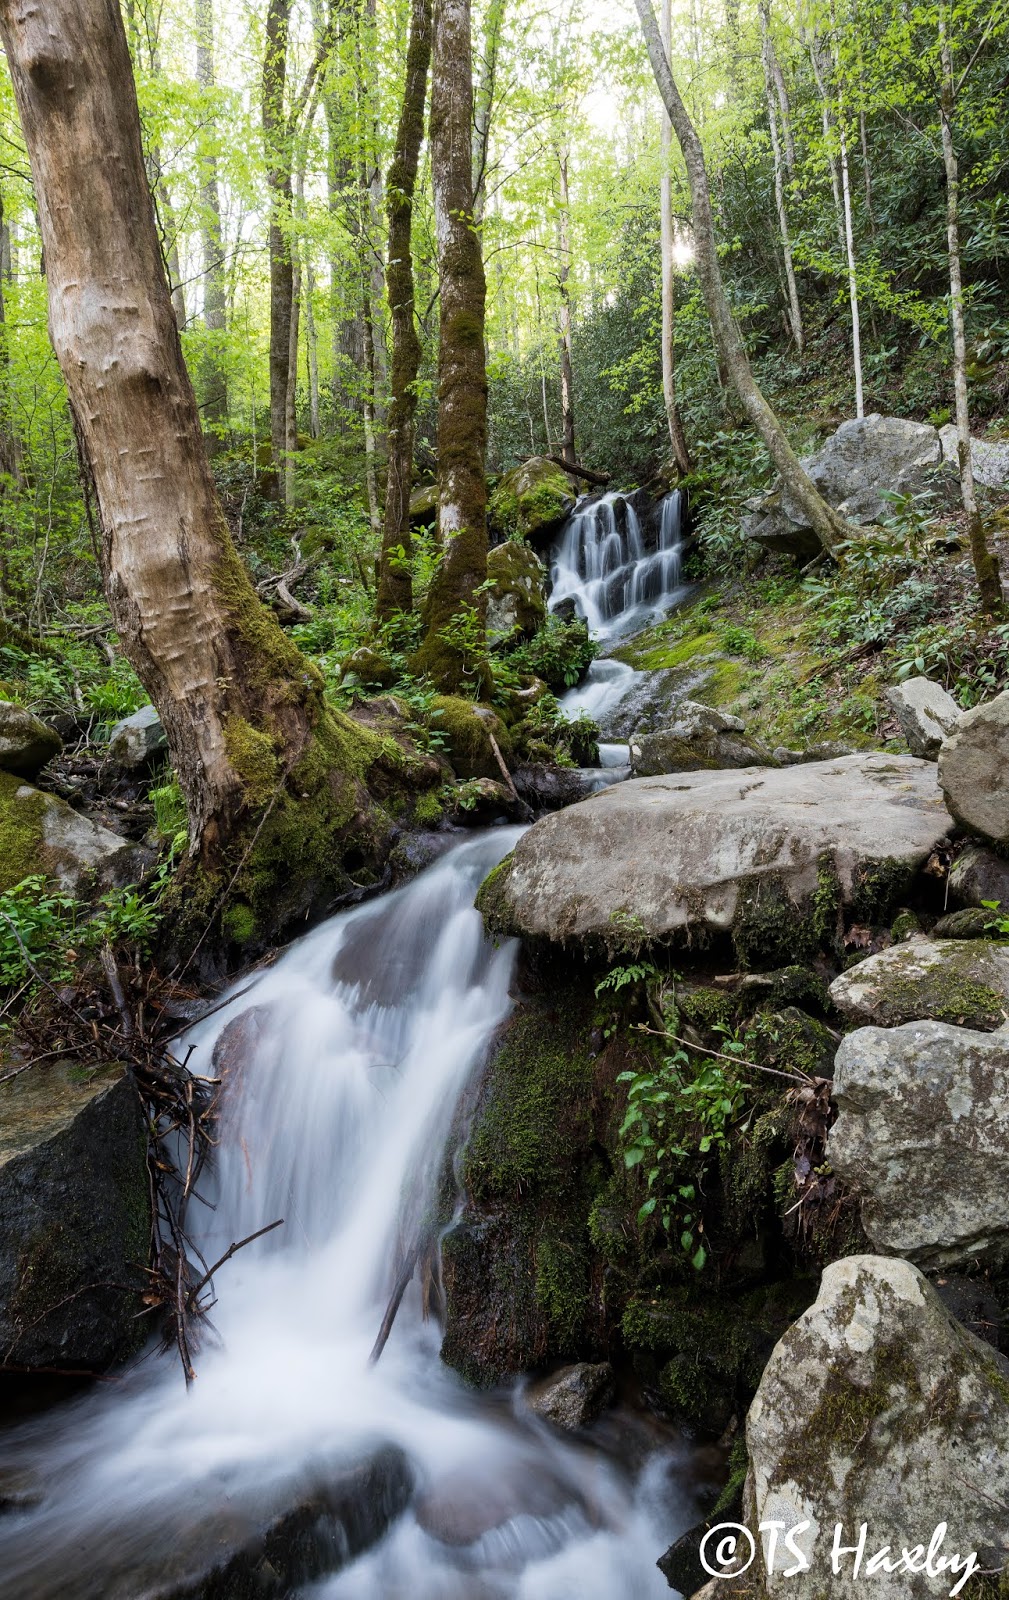
Speaking of filters I use a B&W screw-in polarizer and several neutral density filters (an 8 stop Hoya and a 3 stop B&W) which I use for waterfalls and other times when I want to show motion with a slower shutter speed. Here is an example of a long exposure using a neutral density filter:


I also have a Cokin system of graduated neutral density filters.These square filters fit into a holder and I like to use these to darken skies while retaining as much light as possible on the landscape. Truth be told, I have used these less of late with the Nikon D850 camera because I am finding that the greater dynamic range capabilities of this camera make getting all of the tonalities in one shot without a filter much easier than ever.

I have an older Nikon 800 SB 800 flash which I have used indoors at events. This is a very versatile flash and for years many photographers used this flash for studio work.  I also have a flash extender which is a magnifying glass with a holder to project the flash out further than I could normally. I have used this for wildlife work, but I don't really like to use it because it is awkward to mount on the flash and can give an unnatural look to wildlife photos as well as possibly startling wildlife with the bright flash.

Here is an example of one time when I used the flash extender: 

Is was already getting dark and the owl was too far away for a flash.  There was quite a bit of red-eye in the shot that had to be removed in Photoshop and to me this is not natural looking as the flash is too obvious. I have a few diffusers which fit over the flash to create softer light from a flash and I will use a diffuser when photographing people at events.

Finally, to stabilize my camera I use a Gitzo 3541 tripod and a Kirk BH-1 ball head with a Arca-Swiss quick release system. I have L brackets made by Kirk on both camera bodies. This allows me to switch my camera from horizontal to vertical without having to flop the camera on the tripod to one side or the other which is not very stable and changes the angle of the camera to the subject. The L-brackets also protect the camera on the bottom and one side in case the camera is dropped, an all to common thing for me.  I also acquired a focusing rail to help with macro and other close up type work. This makes it easy to make small adjustments in the distance from the camera to the subject which is critical in close-up photography. I use a gimbal head called a sidekick with my 500 mm lens. This head is less expensive than the standard gimbal head. It allows me more control of my 500 mm lens while keeping the camera steady.

My gear includes other odds and ends such as a weather cover, a remote trigger for really long exposures, few extra camera batteries, a bulb blower for cleaning and assorted lens cloths. All of my gear has been acquired over an extended period of time. There have been earlier lenses which I felt did not yield sharp images and these were sold on Ebay.  Some of the gear will be upgraded such as the 70-200mm lens which is temperamental at times when it comes to autofocus and newer models have a more advanced vibration stabilization as well as better optics. All-in-all though I am quite well equipped for most any photographic challenge. And, to be honest, not all of this gear fits in one camera bag.  If so, I would need to have a strong back or perhaps a mule to carry all of this gear. I use two camera bags and will pack what I think I will be needing into one bag. For example, my macro equipment during the spring wildflower season.

I have a lot of money invested in my equipment and this year I decided to get a separate insurance policy through a company affiliated with the North American Nature Photography Association (NANPA) which gives me peace of mind. Hint: if you are a professional your homeowners policy may not cover your camera equipment, but even if they do the deductible may be prohibitive. Check with your insurance agent.

Most of my gear has been purchased new, but I am finding good bargains on used lenses with KEH.com.  I would prefer to support local camera outlets, but quite often the selection is not what I need and sometimes the price is better online.  I have used B&H, Adorama and Hunt's Camera for the cameras and new lenses.  Finally, as I tell many, a great site to use for research is www.dpreview.com. They provide reviews of most gear and have other great articles. You can even do a side-by-side comparison of similar gear.

If you have any thoughts on gear I would love to hear more. Please feel free to contact me via e-mail. Also, if you would like to see more examples of my work check out my website at www.tomhaxbyphotos.comhttps://tomhaxbyphotos.smugmug.com/

 Finally, if you have not bookmarked my blog, which would be a great idea, there is a link from my website to my blog. Which you might also want to bookmark.


Saturday, February 2, 2019

Three Tips for Photographing Birds


  Three Tips for Photographing Birds

Jesse James was once asked why he robbed banks. His reply, "That's where the money is". This winter, I decided that birds have it figured out by migrating south, so I did likewise by heading to the Gulf Coast. And, while here I am going to be doing a lot of bird photography, because this is where the birds are.  Did you know that there are over 500 species of birds in Florida? No matter where, birds are all around us, you just have to keep our eyes and ears open. 

When it comes to bird photography finding birds is just the beginning. Photographing birds is actually quite easy, but it requires work and practice to capture really good bird photos.  Here are three tips to improve your bird photos:
1.    Understand the habits of birds to put yourself into position for photos. 

Like most wildlife, birds are much more active early in the morning.  Birds feed heavily in the morning after a night at rest. The really good part of this is that soft early morning light can be the most flattering light not just for birds but for all nature photography. Much like planes that take off and land into the wind, large birds will also take off and land into the wind. This knowledge will aid your bird photography. Positioning yourself so that the wind is at your back may result in birds heading right towards you as they take off. So, instead of getting butt shots you get those great flying at you shots. Learn what types of habitats birds prefer. For example, I have a favorite marsh near home that is a magnet for yellow warblers, common yellow-throated warblers and many other birds. In the spring this spot is quite literally full of birds.  

Yellow Warbler

Time of year is important too. As I mentioned, this spot is best in the spring as some of the wood warblers found in my marsh will disperse before summer fully arrives.  There is also a period of time when birds are less visible and they sing a lot less as they are nesting. Some birds sing from favorite trees or shrubs on the edge of their territory. They will frequently return to the same location to patrol their area.

Sparrow

Learning the habits of birds means knowing what foods birds like to eat. One of the black cherry trees in my marsh is a favorite of cedar waxwings and when the fruits ripen it does not take long for a cedar waxwing to appear. Make like a bird watcher, because the best bird watchers could be great bird photographers because they have learned the habits of birds.  

Cedar Waxwing


2.   Try to blend in with your surroundings while minimizing movement and noise   

Try shooting from a blind or even using a car as a blind. But even without a blind, try to blend in with your surroundings by minimizing movement and the amount of noise you make. In some cases camouflage may be needed, but normally just wearing neutral clothing will help.  No bright colors - like hot pink. If you blend in really well, birds will sometimes totally ignore you giving you the chance to capture amazing close up shots of birds as they go about their daily activities. 

3. Use the proper gear including long lenses, tripods, gimbal heads and flash.

My third tip is to use the proper gear for bird photography. Unfortunately this normally requires long-telephoto lenses which can get you closer to the birds. And I might add, it will disturb the birds a lot less. The reason I say that long-telephoto lenses are unfortunate is that they can be very expensive as well as heavy to carry. The good news is that some lens makers such as Tamron and Sigma are starting to make really good lenses that are much cheaper than those made by camera manufacturers Nikon and Canon. If spending thousands upon thousands of dollars is not appealing, adding a tele-extender to a lens is an inexpensive way of getting more reach. There is another way of extending your effective focal length too, read on. 

It is not necessary to use the top of the line cameras, but it helps to have a camera that can shoot at high frame rates (at least 7 frames per second) and show low noise at higher ISOs. Consider using what is known as a crop-sensor camera which has a smaller sensor and gives the effect of cropping to a narrower area, thus mimicking a longer focal length lens. These cameras and the lenses made to fit them are much are less expensive than full-frame cameras and lenses. That sounds good doesn't it.  Less expensive camera and longer effective focal length.  Mirrorless cameras are becoming popular as these are lighter and often have higher frame rates than DSLRs.  One more thing, if I have a choice between spending a lot of money on a lens or on a camera, I would put the money into the good lenses. Good lenses can last a lifetime, but camera technology is changing so fast that what is great today will only be o.k. a few years from now. 

Invest in a good tripod that will hold the weight of a big lens and your camera. This will help you to get super sharp images. No amount of image stablization (Canon) or vibration reduction (Nikon) or other similar systems by other manufacturers which reduce the effects of movement while handholding can match shooting from a good stable tripod.  One other suggestion is to add a gimbal  head to your tripod. This makes handling and supporting a large lens on a tripod so easy that you can move your camera with just a few fingers. Finally, you may want to use to flash to add catch light in the eyes of the birds or to fill in shadows. Flash extenders can also be used to project the flash further away. I do not use flash often, but have made good use of it in special cases. Care must be used though to avoid impacting the birds with a flash.  That is another chapter on ethics that I will cover later as well as other tips on bird photography. I am planning to make an entire pdf guide on bird photography available online in the near future. Until then you can always peruse the bird gallery on my website. If you find these tips useful, please let me know. I would love to hear from other photographers at my e-mail, about your challenges and successes.


Friday, January 11, 2019

Shooting the Sun at the Edge of Day

If you are going to shoot sunrises, or for that matter sunsets, be prepared to stretch your day out to match the sun's day. So, the alarm goes off at 5:00 am, thus it is time to head out to my chosen destination for photography today.  The night before I had checked the weather forecast to get an idea of what kind of conditions I might expect. This will make a big difference as to whether I decide to concentrate on sunrise photos such as this one. 

Sunrise on Intercoastal Waterway

More than anything, broken clouds make the best sunrises and sunsets. To me, a blue sky without any clouds at all is boring. There is nothing to reflect the gorgeous sunrise colors and it is just too much negative space with very little depth, or for that matter, texture. A heavy overcast is similarly undesirable.  Although there may be a lot of texture in the clouds, often there is a lack of color and contrast that really makes a sunrise landscape pop. What really gets my pulse going is if there is a break in the clouds on the horizon that the sun can use to light a bank of clouds from below. This is called gap light and can result in some of the most amazing scenes for your camera.

I wish there were a way of accurately predicting great conditions for sunrises or sunsets. Something that will be reported during the weather broadcast the night before. Perhaps a meteorologist can predict a great sunrise and would be willing to share that information.

However, without such a forecast, I have decided that when preparing to shoot winter sunrises or sunsets along the gulf coast that I have to learn the local weather patterns. So far, I can say that it is best to plan on shooting on the edges of storm systems. That is, either before a storm system arrives or after the departure. Obviously, as the storm is raging there is really no great light and you and your gear will be soaked. When a large-cool-dry high pressure is parked over the region, that is when you get the clear blue skies.  Sometimes if you are fortunate lingering humidity between storms will help to produce great clouds.

When shooting over water, a lack of wind leads to great water reflections. On the morning when I captured this photo the wind was quite still and it was easy to see that the reflections were going to be stellar. Realize that quite often fronts containing storms stir up lots of wind and will scatter your reflections.

I will share with you a few technical details on this photo. My gear includes a Nikon D850 and the lens chosen was my 14-24 mm f/2.8 lens. I really like this lens for skies. Shooting a wide angle lens just seems to make the sky come alive. The landscape must complement the sky, but a really great sky really captures your attention and adds so much depth to an image. My issue with composing this photo was that the sandy bottom was quite apparent in many of my compositions. I finally found a composition where the water was a mirror rather than a window.

Of course, I almost always use a tripod with a ball head to steady my camera and to allow me to really look at my composition. There is almost no need to hurry when the scene is slowly unfolding and the tripod slows me down just enough. 

Finally, for the camera settings I used ISO 100, f/8 at 1/80 second at 14 mm. The combination of ISO, aperture and shutter speed gave me the depth and the slight motion in the water I wanted while rendering the fine details at a suitable ISO to minimize noise.   I almost always use a setting to lock the mirror up and a shutter delay of 1-2 seconds to allow any vibrations to  dissipate.  This helps to keep my images sharp. Knowing that the motion in the reflection will mean that no matter what I will get some blur, I aimed my auto focus point quite a ways into the photo to keep the clouds in the sky sharp. Checking the histogram in the camera showed that I had the entire range of tonalities in the image and thus would only need minor adjustments in Lightroom to bring out the scene as I saw it with my eyes. This is now one of my favorite images and I would just love to see this in a large metal print.

Here is another of a picturesque sunset made by great clouds........ 

Smoky Mountains Sunset


Now, I must close as the alarm is again set for 5:00 am for another sunrise tomorrow. Tonight I will dream of great clouds and light.


Friday, January 4, 2019

Bird Photography at the Black Point Wildlife Drive


In closing out 2018, I spent the last two days of the year photographing birds at the Black Point Wildlife Drive. Located on the Merritt Island National Wildlife Refuge near Cape Canaveral, Florida, this 7-mile one-way scenic drive is one of the top spots in Florida for photographing all kinds of birds. Of the 503 species of birds identified in Florida, to date, 358 species have been identified at the refuge. Along the drive I spotted wading birds such as little blue heron, tricolor heron, great blue heron, ibis, roseate spoonbill, reddish egrets, snowy egrets and more. Small-fast-moving wood warblers, sparrows, chickadees and finches darted throughout the vegetation. There were osprey galore, (look on the tops of the telephone poles), and lots of ducks, geese and other diving birds. Look for the birding checklist at the kiosk that gives a more complete accounting of the birds there.

Other areas on the refuge such as cabbage palm and hardwood hammocks,  oak scrub, pine uplands and more add to the diversity of habitats for the many bird species. Away from the wildlife drive, I was even fortunate to spot a kestrel and an eagle. 

Reddish Egret


These last days of December were quite warm and dense fog in the mornings lasted until 10 am. This meant that my normal routine of photographing early in the morning had to be adjusted. Still, there were so many birds that posed for my Nikon D850 that I have resolved to return.

Here are a couple of my tips for getting better bird photos: 

Upon spotting a bird I would often set up my tripod and camera with the 500 mm lens and 1.4x teleconverter. At times I did not even leave the vehicle, using it as a blind and the window frame for support.   A couple of recent changes in my techniques that have helped me to improve my bird photography are the use of a smaller aperture and a higher ISO.  By using apertures from f/8 to f/11 I am using the sharpest apertures on my lens and adding the needed depth-of-field for the larger wading birds. There was plenty of light, but by using the higher ISO I was able to use faster shutter speeds to compensate for any camera movement or movement in my subjects.

Roseate Spoonbill


Kestrel 

I feel like in the time allowed by my travel budget that I got some really great photos and I would highly recommend the Black Point Wildlife Drive for any photographers wanting to add to their bird portfolios. In fact, the North American Nature Photography Association (NANPA) is hosting a regional birding workshop there from January 27-30, 2019. 

More of my bird photography, as well as my other photography, can be viewed on my website at tomhaxby photos