Monday, November 8, 2021

Supply Chain Blues

      The issues with the supply chain are real and seemingly getting worse. Well, what does this have to do with my photography? It has started to affect my ability to take and sell photos. The first indicator was the problem I had getting photos to restock a local store with prints in August. Delay on top of delay pushed the completion of my order into an extended out-of-town trip. That meant I could not pick up and deliver the prints myself. Fortunately, the printing company took all of my information and delivered the prints to the store while I was gone. Then in September, I ordered 2 spare batteries for my camera. It is almost 2 months later I have no idea where the batteries I ordered are. Then things got really absurd. MY laptop computer was in need of being replaced. So I ordered with the hope that an in-stock computer and a overnight delivery would get it to me before my next trip. Instead of showing up inside of 16 days, delivery was finally attempted while I was again away while leading a photo tour. I pleaded with the computer supplier to delay delivery until I returned home to no avail. The order was flagged for a signature and I was not able to reschedule the order with the shipper. Not feeling that I could re-order and take delivery before my next trip, I decided that it might be easier to order a new battery for the old laptop computer. My mistake was ordering based on the model number of the computer and it was the wrong battery. Hopefully that has been corrected and the correct battery will be delivered today. That still does not solve the issue of a full hard drive. Meanwhile, my Adobe software on my laptop will not update. 

What is the lesson from all of these headaches with getting needed supplies? It is not just photographers who are going to be affected, but almost all businesses will have to adapt to a new way of doing business. You cannot depend on having supplies when you need them, but only when you can finally get them. 

If you can possibly plan ahead I would suggest doing so as the Supply Chain Blues may only get worse.  And if anything is coming from Asia plan on your supplies being help up in the Pacific in a holding pattern.

Saturday, October 16, 2021

Lightroom Workflow

I do not pretend to be a Lightroom© Master, and I do not like to spend an inordinate amount of time processing my images, but because I shoot in RAW I do have to process my images. RAW means that the camera does not do any processing, like it does to .jpg images. The advantages  are a wider color gamut and greater resolution than .jpg which is a compressed format designed for use on the web. 

I currently have 2 versions of Lightroom©. An older version, Lightroom6, on and older desktop computer and Lightroom Classic© on my laptop computer. Both are easy to use because they mostly involve using sliders to adjust color, exposure, etc. and for more robust editing work, Lightroom works seamlessly with Photoshop©. 

My editing work in Lightroom follows a pattern or workflow such as Crop/Straighten>Clean Up>Correct Exposure>Optimize Vibrance and Saturation>Sharpen>Correct for lens distortion and, if needed,  adding a slight vignette. These are global adjustments and I try not to overdo anything like saturation or sharpening which can lead to unnatural looking photos. Local corrections may be needed to bring out details in parts of the photo.  In more detail my workflow: 

Cropping

 Looking at the photo on a computer monitor is better than what I can see in a viewfinder or viewscreen on the camera and it is rare that I do not need to crop to improve an image. In the develop (shortcut to get to the develop module is keystrke "D") module I use the keystroke "R" to activate the crop tool. If there is a horizon or other feature which should be horizontal or perpendicular I may need to straighten that.  I will use an older image as an example:


This sunset is the file that I captured in camera.  The first thing I want to do is straighten the horizon so the lake is not draining off the page. 


Just below the Histogram in the upper right corner is a crop and straighten tool. In this case I click on the level icon for angle and draw a line along the horizon. This automatically straightens and applies a crop to "square up" the image. Selecting Done will apply this edit. If there is anything on the edge that does not belong that will immediately get cropped out. This is the crop frame tool and can be retain a size ratio if needed. I forget about this feature often and may end up doing this manually.

Clean Up 

From time to time my sensor will collect dust and when shooting something with a sky or even a white board, these dust spots will show on the image. Here, I like to use the spot removal tool, shortcut "Q" to zap these spots. Here is an image of a plane, not the greatest image, but it shows the dust spots.  Hint: you can click on the image to see a larger image.


After opening the Spot Removal Tool yo
u can see the spots even better if you select visualize spots in the lower left corner.

After opening the spot removal tool (Q) a box will open. Here you can choose between clone and heal. Clone will take another area of the photo and paste it over the spot. The area to clone is chosen by Lightroom, but you can click and drag that area around. Heal will use pixels around spot to "heal" the spot. You can also set the size of the brush, feather amount and opacity here also. So,  in my image with visualize spots selected (above) I will click on the white dots which are really black spots on my image thereby zapping those spots away. It may take some practice and sometimes I have to resort to using Photoshop because it does a much better job. Well, actually I don't have to fight Lightroom© to zap the spots to my approval.


Exposure

Next looking at the exposure, the histogram shows a slight overexposure near where he sun is which is to be expected. This is shown by the lighted arrow in the upper right corner - a warning that your image is outside of the range of the sensor. The pixels going off the right side of the graph shows the same thing.  I used the Auto White Balance setting on my Nikon D850 camera which usually does a pretty good job. The one exception is shady conditions which are often too blue for my liking. On this image I want to darken the highlights a little and increase the contrast just a tad. This brings back some of the color in the sky close to the sun. I also like to drop the blacks a little as this will help with contrast. I do not like images that are muddy or lacking contrast. 


 These are changes I have made in the treatment dialogue box. Now I am ready to adjust the "Presence".

Presence

There are 3 sliders in the Presence box: Clarity, Vibrance and Saturation. I usually adjust each. For clarity it is between 15-20. Any more than this an the image looks for lack of a better term "fuzzy". I adjust vibrance to just below 20 unless the image is really lacking color such as a photo taken in fog. And Saturation may be between 2-7 depending on the image. Vibrance and Saturation adjustments are done by looking at the monitor which is calibrated so hopefully What I See is What I Get. Now the difference between vibrance and saturation is the vibrance will saturate colors that are not already saturated more than those that are already saturated. Saturation will saturate everything equally regardless of whether that color is already saturated.  Remember these are global changes affecting the entire image and I do not want to overdo. Oversaturation is to me a common mistake that leads to unnatural looking photos of nature.

 Sharpening 

Skipping over the Tone Curve box because I have already done most of this work above,  the HSL box which stands for Hue, Saturation and Luminance  and the  Split Toning Box. I move down to the Sharpening box.  Now, sharpening is really an illusion created by adding a dark area around each pixel. Overdoing sharpening is another mistake that many make.  I will generally move the Amount slider around 100 for sharpening with no changes to the other sliders.  This may vary by lens and camera for you.


Lens Corrections

If my lens profile is available I will next Enable Profile Corrections. This will help to remove any distortions caused by the lens as well as any excessive vignetting (darkening edge and corner areas). With the "Profile" highlighted selecting Enable Profile Correction will automatically correct for any lens effects. 


Newer versions of Lightroom© will undoubtedly have more lens profiles, and if you can find your lens you can add the profile. If it does not have your lens, not to worry, this is not a huge adjustment that most will notice if it is not applied.  The exception would be with extreme wide angle lenses which can have a lot of distortion.

 Effects

I tend to skip over the Transform box unless I have major corrections to make. I move on to the final box which is Effects. I like to use the Post-Crop Vignetting to add a slight vignette to some images. For example darkening the edges slightly to make a butterfly stand out. Caution: this too can be easily over done. I like to move the Amount Slider left just enough so that it is not obvious. Somewhere in the neighborhood of  -10.  It is not really needed on my example image as I don't have a subject to highlight. 

 Finally

I may have left some small details out, but that was due to time and space. Lightroom is a very complex and powerful editing tool and you will discover some of the nuances as you work with it such as local edits..... 

 Local Edits

I am mostly done will all of my global edits and would normally move on to local edits on portions of the image that require more work. That will be in the next blog post. Stay tuned................  


Thursday, October 14, 2021

A Photo Day at Seven Bridges Natural Area


Most of my household chores were completed and it looked to be a beautiful fall day, so I grabbed the camera gear and off I went to the Seven Bridges Natural Area. I had been thinking of photographing the cedar trees there since my trip to the UP in late September.   There I watched as fellow photographer Nick Bristol worked a scene along the AuTrain River which included cedar trees.

The cedars at Seven Bridges are very unique. Their root collars are exposed and there is a grove of cedar where there is little ground clutter. Little did I know just how good the shooting conditions were going to be that day. 

 I started with a small area of cedars and had to work around groups of teens passing through. That was o.k. as the light at times was just too bright leading to unwanted hotspots. The one advantage though was the lack of wind. It was unusually calm and when the sun ducked behind clouds photography conditions were perfect.  For most of the photos I used a white balance setting of cloudy. This yields a warmer tone to the images. Yes, I was shooting RAW files and could have changed white balance when processing.  By presetting my white balance enabled me to see what I was getting. Almost all photos were shot using ISO 100.  The photo here was shot at f/4.5, 1/10 sec. @ 40 mm with a 24-70 mm Nikor lens.  I did extensive processing in Lightroom and I will explain my processing in another blog post later.


Continuing my work in the cedar grove I really liked the two photogenic cedars framing the grouping further back. I was very conscious of keeping the bright sky out of the images. It added nothing and only served as a distraction.  ISO 100, f4.5, 1/8 sec. @ 40 mm.
I have been to Seven Bridges before and it is very difficult to shoot down the entire river due to the depth of the river and rapids. Too the trees crowd the edge of the river. So, I decided to work with what was available. And the trees with their exposed roots became prominent in many photos. Such as this one. ISO 100, f/14, 1.6 sec. @34 mm. Have to love all the lichens and mosses on the trunk and the ornate roots. Too I decided to include a little of the river and liked the other cedar hanging on the river bank. The fall leaves on the ground added a nice touch too. This is the essence of Seven Bridges.

There are a number of bridges that cross the river., and I have never really stopped to count  ISO 100, f/14, .6 sec., @24 mm  


And shooting from these bridges is really the only way to capture most of the river unobstructed. As luck would have it that day, late afternoon sun was spotlighting a fall-colored beech and reflecting in the water. I waited for a few people to cross the bridge as it was bouncing. And too, after shooting  a few horizontals, I knew I needed a vertical to show the motion of the water in the foreground. The wind was still calm so I had not problem with dancing leaves. ISO 100, f/14, .8 sec @ 32 mm. I love the warm/cold colors and the motion in the river in the foreground.  


After a pizza dinner in Kalkaska I headed home to process the images. I did the processing on my older desktop computer which still has Lightroom6.  Some of the cedar trunks were a little too yellow, which is not natural,
so part of my processing was to use the paintbrush to change the color temperature to a colder and less yellow cast. There was a little work too with adjusting exposure and a light touch of vignetting on the edges. As always when shooting RAW, I made adjustments to the vibrance and saturation along with working on contrast through highlights, shadows and blacks. Much like Ansel Adams who did extensive post-processing from his negatives, myfinal images were a process of work in the field and a lot of work in my digital darkroom. This last image was ISO 100, f/14, 2.5 sec. @31 mm.


Friday, September 24, 2021

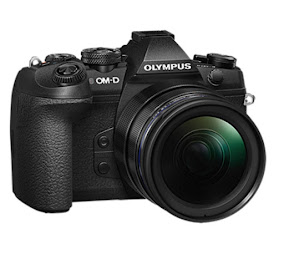
Test of Olympus OM-D E-M1 Mark II

 I have been a faithful Nikon user for many years now and still love my trusty Nikon D850, but it is heavy and I am getting older, aren't we all. And to be honest, carrying extra weight is not my idea of fun. I will admit too that last year I traded my trusted 500mm f/4 lens for a much lighter 500mm f/5.6 pf lens and this has enabled me to get images I never could have gotten because the other lens was too heavy to carry far afield. Furthermore, like all camera manufacturers, Digital Single Lens Reflex (DSLR) cameras are no longer being upgraded. Newer mirrorless cameras are getting all the new bells and whistles.and to begin with they are lighter and have faster capture rates. 


So, after a recent conversation with the owner of the Traverse City Camera Shop I decided to try the Olympus OM-D E-M1 Mark II and most specifically I wanted to try the Procapture feature. This allows capture up to 60 frames per second with the UHS ii SD Card. These cards actually have two copper strips as connectors as opposed to only one in the UHS SD cards. This means thay care write data much faster. I have heard and seen examples of the Procapture feature, but wanted to try for myself. 


Now having been a Nikon user all these years, navigating the controls and menu screens is much different and would take some practice to reach the same ease I feel with the Nikon system. I did have some experience with the Olympus menus as I have an Olympus TG camera which I have used underwater. Eventually, I did get the camera set up as I wanted. I might add too that I do not own a UHS ii SD card so I was not able to achieve the top frame rate. But even without a UHS ii Sd card my first trial of Procapture was impressive. Keeping the shutter button depressed while photographing fast-moving chickadees meant that I got ALL of the action. Even the quick motions of the chickadees as they took the sunflower seed. 


While static poses of wildlife can be very beautiful, I could just imagine being able to capture action shots that truly shows the majestic flight of a bird or butterfly. 

I will say that I did not do a complete evaluation of the camera, that has already been done and I am sure there is a YouTube video out that speaks to the overall performance.

This camera has been on the market for several years now, and newer versions I am sure have lots of improved features. I am seriously considering going to a lighter and newer mirrorless system. I would however like to try the Nikon mirrorless cameras as learning the new menu would take some serious time. However, I really do like the Olympus Procapture feature for wildlife work and this is enough to give serious consideration to an Olympus system.


Wednesday, June 9, 2021

Photography from a kayak

 The Experience

Some people may be intimidated by taking expensive electronic gear in a kayak on a lake or river. However, with the right gear and practice it is a great way to get photographs of wildlife. Here is how I have become comfortable and proficient in taking wildlife photos from a kayak. 

Early River Trips

    It all started more than 15 years ago on the Waccissa River in northern Florida. I started taking my camera gear with me in the kayak, because the Waccissa River is a hot spot for birds and wildlife. While the first trip with expensive gear was not imbedded in my memory, I still remember honing my techniques over many trips there. In fact, I do remember my first photo sale was of an alligator sunning on a log on the river. It was primitive compared to the work I can do with the years of practice and improved gear. Early on I decided that photographing from a kayak had distinct advantages. Wildlife is less wary and more approachable and you are at eye-level which yields a more engaging photo.  Plus,  you don't have to carry heavy gear overland.  I remember too discovering the need to anchor on the river and parking in floating weed mats to keep from floating downstream as I was composing a photo. This did lead to a few unexpected close-up encounters with alligators.  

Lake Photography

    More recently I have been photographing loons, swans and other waterfowl on a lake near my home in Michigan. Of course the big advantage on a lake is the lack of a current. It is even better when you get out in the morning while the wind is still. The reflections are better and the kayak is steady. I almost always photograph early for the good light and calm conditions. One caveat, on cool mornings there is often a lot of fog on the lake. Finding loons or any wildlife in the fog can be a challenge and photographing in the fog is even more difficult. So I have an excuse to sleep in a little later on chilly mornings.

Loon taking off   


What kayak?

     Some have asked recently what type of kayak do I use and is it stable? I have been using a Perception Sundance 12 foot kayak, and yes, it is very stable.  I also have insurance on my gear, but I am sure that I would have to recover any dunked gear in order to submit a claim. Experience has allowed me to feel very comfortable in a boat with my gear. I do usually have dry bag on the floor of the kayak in front of me because that way I don't have to set the camera down in pools of water in the bottom of the kayak. 


Camera Gear

    Until this past year I was using a 500 mm f/4 lens which is a heavy and awkward beast of a lens. Last year, I traded the 500 mm f/4 for Nikon's new 500 mm f/5.6 pf lens which is super light and makes a huge difference in the kayak.  I still like the autofocus and bokeh on the f/4 lens better, but I can get shots now I never would have gotten with the beast lens. Quite often I use a teleconverter, either a 1.4 x or 1.7 x to give better reach.  I always have a life jacket with me, but personally I think the kayak would be my life raft. One thing I have not done is to fashion any type of tripod or camera support for the kayak.  Believe me, I have tried, but have not found a system that I feel comfortable with.

A bigger challenge has been photographing wildlife on the Silver River in Florida. The current is much faster that the Waccissa and there are fewer weed mats to anchor on. There is also a lot of boat traffic. But I have still found opportunities to capture wildlife on the river.

Rhesus monkeys, Silver River


This female monkey and baby were photographed on the edge of the Silver River, just before a group of kayakers arrived to scare them off. Along with alligators, the monkeys on the Silver River can be the most dangerous. But common sense and giving the animals space is the best way to avoid unwanted conflicts. The hardest part of photographing the monkeys is the vegetation which often obscures part of the subject or creates odd shadows. Unlike being on land you cannot step to the side to get a better angle, you have to set the camera down paddle a little and hope you have a good spot and that the current doesn't move you away too quickly.  The green heron was on the edge of the river where there was little current and thankfully it was an overcast sky, otherwise I would have had difficult lighting conditions under the shore vegetation.  


Ethics 

Although wildlife may be less wary of a person in a kayak, basic ethics should be applied when photographing wildlife. While I do not wear camo, I also do not wear brightly colored clothing. The wildlife can see you in a kayak, but no need to send a warning that brightly colored clothing will give.  I have learned to approach loons in way that will not bother them. After they do not see you as a threat, they are much more calm and almost seem to ignore you as they go about their daily lives. Plus repeated trips allows you to become more familiar to the loons. If I know the location of a nest, I stay well away.  I would not have it any other way. I almost always use 500 mm or more lens. This allows me to keep my distance and I am as quiet as possible, even when paddling. I often avoid eye contact which seems to soothe wildlife. And, although I often get questions about where I found xx animal, I do not reveal locations on social media. There are too many other photographers who would stampede a location. It is for the protection of the animal.

Green Heron, Silver River


 In Conclusion 

So, it is quite possible to get some really astonishing photos from a kayak and it is easier than you might think. Know your limits and skills and proceed at a pace that is comfortable to you. You may get some really amazing wildlife photos from your kayak.


Thursday, May 27, 2021

Gear Chat

      Recently the auto focus on my camera lenses seemed to stop working. Well, it had been an intermittent problem until it seemed that it had stopped working at all. And, it was on more than one lens which should have been a clue that it was the camera and not the lens.  Fortunately, in my area there is the Camera Shop which is a great little full-service camera store. Yes, bricks, mortar and people who you can put your camera into their hands and have them take a look at it. I was envisioning sending another camera back to Nikon for repairs and waiting for the return. Wondering too whether I was going to need to get a loaner. As a Nikon professional services member I can get loaner equipment and my repairs are done faster. Luckily the manager, Jason, noticed that the silver ring on the camera that fits up against the lens was loose. A couple of screws,were tightened,  I always find loose screws, and just like that, the auto focus started working again. I mention this issue as a heads up for you Nikon users. I am not sure if this same thing could happen with other brands. But this is an easy fix on Nikon cameras if you know to look for it. 


My next gear topic is a new little lens that never ceases to amaze me. This is my 25mm Laowa Ultra Macro lens.

With this lens, I can capture many new macro subjects. The lens has a bit of a learning curve. It does not have auto focus and you have to view and frame the image on the view screen. Hint: I use the focus peaking feature on the Nikon D850 to help with focus and realize that the focus plane is very small. And you need a lot of light to be able to see the subject. Hint: I use a litra mini-light which is very bright. Mostly I have been using it for jumping spiders. This lens reveals a fascinating world of these tiny spiders. And really I have only just begun to experiment with this new "toy". But experimenting is one of the exciting things about the world of digital photography.


Sunday, May 16, 2021

Florida is For the BIrds

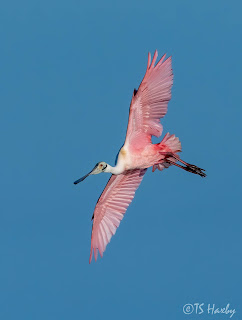
It has occurred to me that birds are not so bird-brained after all. Instead of enduring months of endless snowstorms and a lack of food in the north, they fly south for the winter. So, I decided to copy their behavior and headed south to Florida for the winter. My experience is that Florida birds are much tamer than birds further north. That is great because over 500 species of native birds have been identified in Florida. This past winter I visited several birding hot spots. Orlando Wetlands Park, with numerous pools favored by wading birds, can be covered on foot and often I find my favorite birds there. By far my favorite is the roseate spoonbill. I have been fortunate to find this large pink bird with the funny looking bill many times. Sometimes I get lucky with the spoonbills in flight against a blue sky.

Roseate spoonbill


Another great spot for birds is the Silver River. The Silver River is located in the center of the state and has an incredible variety of birds that can be photographed from a kayak. My favorite may be the green heron. It spends most of the time along edges of the river stalking prey. Well, now that I say the green heron is my favorite, the incomparable wood duck, especially the colorful male, is a desirable photo subject too.


You may ask what does it take to get photos of birds? First, a great deal of patience. Some of the birds may be wary and my approach by kayak is slow and quiet. In the winter of 2019 I used a Nikon 500 mm f/4 lens. This is a great wildlife lens, but it is heavy and cumbersome to use in a kayak. I frequently paired the lens with a 1.4 teleconverter to get more reach.  In 2021, I switched to a 500 mm f/5.6 pf lens which is much, much lighter. My only regret is that this lens does not auto-focus as quickly and use of a teleconverter slows the auto-focus even more. But I have still managed to get some great photos with that lens, such as this little blue heron on the Silver River in 2021. 


Another discovered birding spot is the area around Cedar Key.  The quaint town of Cedar Key is located on the west coast of Florida in the heart of what is known as the Nature Coast. The possibilities for pelican photos from the pier there are nearly endless.  This was a feeding frenzy of pelicans seeking fish portions from a fisherman cleaning fish.The pier at Cedar Key is elevated above the water and this lends itself to pelicans in flight (below). Many parks and wildlife refuges near Cedar Key provide opportunities for even more birds. My favorite is Cemetery Point Park which has a long boardwalk through mangroves along a bay. Lots of osprey frequent the area and spend their time diving for fish. 


Back on the east coast, the Black Point Wildlife Drive, near Cape Canaveral,  is another Florida birding hotspot. There, access to wetland pools is by a one-way auto drive. Often the best way to photograph birds is to use your vehicle as a blind. This tri-colored heron was at eye-level from my vehicle/blind - always preferred.

An eagle makes a landing with nesting materials at the Orlando Wetlands Park. These are just a hand-full of the many bird photos I have gotten in Florida. Hopefully you can see that Florida is really for the birds and to be honest, it is  nice to have sunshine and nice weather for photographing birds too.